
Make electrical safety a top priority with this setup, please.
Here are the basic construction instructions to create the Suction Assisted Laryngoscopy Airway Decontamination (SALAD) simulator (AKA “VomiQuin”) from the airwayNatic @jducanto.

SALAD Mannequin Construction
By James DuCanto, M.D., Quality Officer, Aurora St. Luke's Medical Center, Milwaukee, Wisconsin USA (2015-10-03, updated 2015-10-23 by Y Chow)
The system uses an inexpensive corded power drill for the pump.
As you know fluids do not mix well with electricity and make for a dangerous combination so use this set-up at your own and your participant’s caution. Disclaimer: this system is NOT designed by engineers nor electricians.
.
Use a ground fault circuit interrupter (GFCI) based source of power.
.
Do not be complacent with the power systems — I have not had a problem yet in close to 10 simulations, but as I am finishing my 2 year rotation of quality officer of the largest private hospital in Wisconsin, I’ll simply say that most accidents, mishaps, and events occur due to Incomplete Procedures. Don’t skip over the step of keeping the drill and its power systems away from the simulated liquids. Further improvements in this system will address this one detail, but for now, this is the way to get the system going.
.
- Obtain a mannequin with a well defined esophagus.
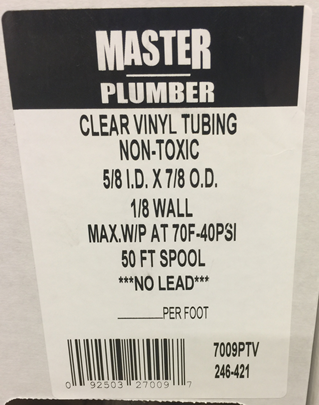
- Obtain PVC Tubing
- 5/8″ inner diameter (I.D.) and 7/8″ outer diameter (O.D) with at lease 8 feet of length. This is for the various parts of the SALAD system works very well with quick connects on garden hoses.

- 5/8″ inner diameter (I.D.) and 7/8″ outer diameter (O.D) with at lease 8 feet of length. This is for the various parts of the SALAD system works very well with quick connects on garden hoses.
- Insert a segment of the 5/8 PVC tubing into the esophagus of the mannequin.
- Nasco brand
 mannequins allow this without much trouble, Laerdal mannequins may require a little improvisation with a connector.
 - Bind the tubing to the esophagus with a zip tie or alternatively, an acrylic glue such as Shoe Goo.


- Nasco brand
- Use garden hose Quick Connects to
 make hose connections (Figure 3). To cap off the 5/8 hose, use two of the male quick-connectors back to back so that they can plug into a hose, with the free end available to interface with a female quick-connect piece.
 - Obtain an inexpensive (10 dollar)
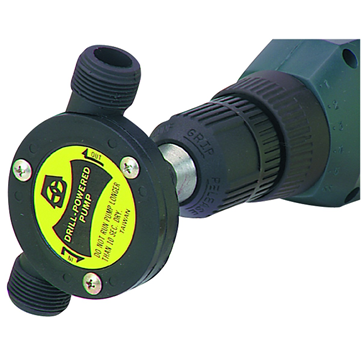
 drill powered fluid pump from the hardware store. These pumps don’t last long as the artificial vomit is a bit hard on them (vinegar degreases the bearings, and the pumps begin to seize). Count on the pump lasting only one or two simulations, as long as they are within a few days apart. Otherwise, resign yourself to the knowledge that these things won’t last long.
 - Acquire an inexpensive (24 dollar) corded variable speed drill for the simulation.
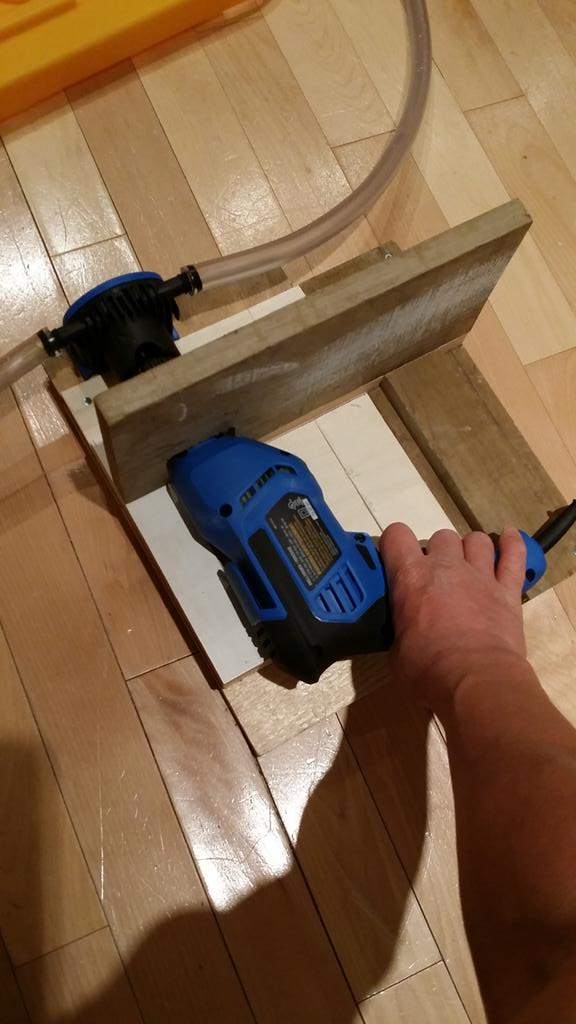
- Utilize the Quick Connect system to fasten a length of 5/8 tubing from the output side of the pump to the PVC tubing on the mannequin. The most efficient arrangement is to create a 5/8 PVC tubing of 2-3 foot length capped by the female quick connects on both ends, and cap the drill pump on both ends with male quick connects.
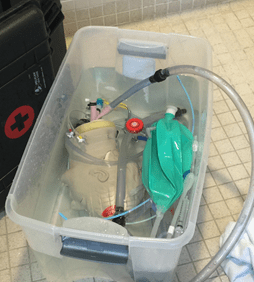
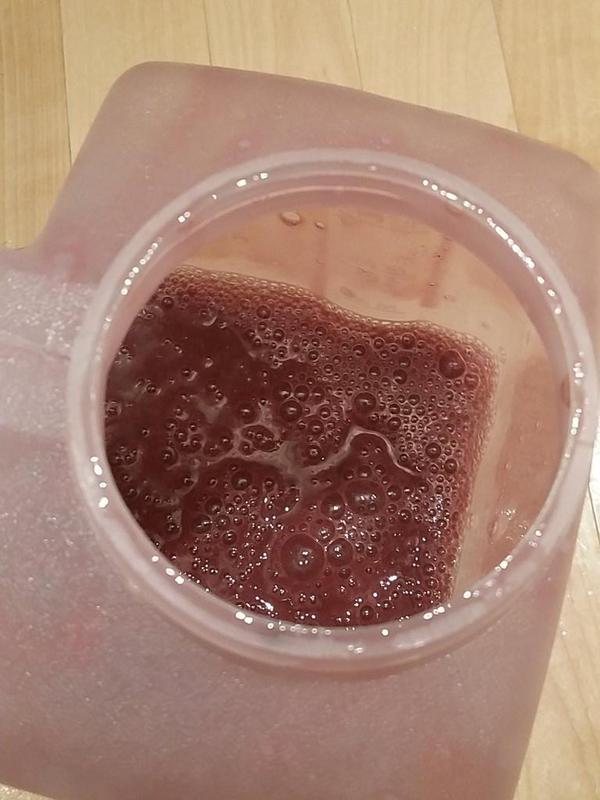
- Create a reservoir
 system for the artificial vomit. I have used 2.5 gallon water carriers
 - Mix the artificial vomit in the following formula:
- Xanthan gum powder 10 ml (2 teaspoon) per 1
 liter of white or apple vinegar. This can be prepared the night before the simulation.
- Vinegar is used to help prevent mold from developing in the hoses.
- Yen’s limited experience with an N=1 so far as of Sep 2015 is that water can be used instead but make sure that you thoroughly clean the setup with water afterwards. The xanthan gum solution is organic and will spoil with time.


- Use a blender to mix thoroughly. You will want at least a gallon of artificial vomit to keep the simulation running smoothly between students.
- Food coloring to make the mixture a dark color helps the simulation. I am not impressed with Red coloring (looks brown on VL), but Green is impressive, and absorbs up the laryngoscope light, further making the simulation more challenging.
- Xanthan gum powder 10 ml (2 teaspoon) per 1
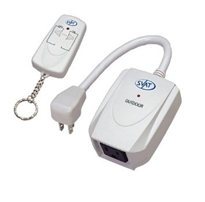
- Control Systems (Make electrical safety a top priority with this setup, please):
- Table Lamp
 Dimmer (~10 dollars rheostat): This gadget will allow you to control the speed of the drill (when the drill is locked on maximum RPM). Adjust the speed of the pump to the desired flow rate of simulated vomit. [Yen’s thoughts: Note that I do not think these are designed for use with motorized parts and disclaimers on the parts may state to use with max 150-300 W lamp load to reduce the risk of fire. Prolonged use may increase the risk of damage and overheating to the parts. Another option might be to just use the variable speed trigger of the drill but this is harder to remote control it.]
 - Remote
 wireless on/off switch (also around 10 dollars)
 - Arrangement of Control System:
- Plug wireless switch into GFCI wall socket. This is highly recommended due to the vicinity of fluids and the electrical wires.

- Plug the table lamp dimmer into the switch. Now plug the drill into the table lamp dimmer, and set the drill to maximum speed by squeezing the trigger of the drill and depressing the colored locking button on the left side of the hand grip.
- Vary the speed of the drill by sliding the switch on the dimmer.
- Connect drill to the pump. Do not run pump without liquid.
- Keep all electrical connections well away from fluids.
- Plug wireless switch into GFCI wall socket. This is highly recommended due to the vicinity of fluids and the electrical wires.
- Table Lamp
- System setup
- Connect all tubings
- Put towels on the floor: this could get ugly.
- Prime pump and system-mannequin using gravity from Simulated Vomit reservoir to pump and then mannequin. Set speed control to slow to moderate.
- Have your suction system ready. Ensure that it is working properly. Consider having a manual backup for the participants to try as well. Having participants use the equipment that they are used to is most valuable.
- Check electrical safety in the setup, please.
- Use a GFCI plug-in source of power.
- Electrical safety is your responsibility, as you are using electric systems around fluids. Be smart, plan ahead to avoid fluid from getting on the drill, wire connections or other electric parts. As many of you guys are FireFighters in addition to Paramedics, I welcome your suggestion to improve this safety detail (like a GFI powerstrip for example). We also welcome any expert opinions from engineers or electricians etc.
Mounted drill pump and splash guard
- Initial learning exercises:
- “Static Exercise”—Fill the pharynx of the mannequin to the level of the uvula or slightly above. Give the participant directions to decontaminate the pharynx thoroughly, then intubate the trachea, followed by deliberate suctioning of the tracheal tube with a 18 french flexible suction catheter to decontaminate the tube and trachea.
- “Dynamic Exercise”—Run the pump during the intubation exercise in such a manner that the participant is challenged to decontaminate the airway but not overwhelmed.
- Video laryngoscopy allows you to see what they are faced with
- Standard traditional geometry VL/DL blades allow the student to do DL while you observe the screen and record the attempt for debriefing/review.
- Do not humiliate the student deliberately by totally and hopelessly overwhelming them with Simulated Vomit—you are trying the build their skill and understanding, not tear them down. Yes it is possible to do that with this system.
- You will be surprised at the emotional reaction the students will exhibit when you put them through this simulation. You want to build resilience and tenacity with this exercise—you do not want them to exhibit fear and avoidance at this challenge, neither in simulation nor in actual clinical practice.
- Check that electrical systems remain fluid free and clear from the liquids.
- System Tear Down
- Check that fluids and electrical systems have remained clear of each other first. Be cautious as expected with fluids are used near electricity. Disconnect the power before tear down starts.
- I will commonly soak all parts of the simulation (except the power drill) in a tub of water. Purchase a moderately large plastic bin to use to soak the mannequin head as well as other parts.
- Gaskets in the Quick-Connects usually are eaten away by prolonged contact to vinegar—purchase a pack of extra gaskets, and throw away gaskets that are obviously disintegrating.
- Vinegar will prevent mold and other biologics from growing in your mannequin system—that is why I recommend it. (Yen has used water without issue in his N=1 as of Sep 2015. In this case it is crucial that the system be flushed and cleaned extra thoroughly. Residual xanthan gum and moisture will spoil and smell and possibly grow mold).
- Low tech non-powered version is being developed/trialed by Yen. As of September 2015 it has had one trial run. He will update this post on his adventures with this in the coming months. [Update 2015-10-22 use the foley bag only for single use sim session … or it might explode from wear and tear. Other thoughts are to try making or buying a hand pump for it but I have not tried that yet.]


https://twitter.com/TBayEDguy/status/646651352609914880
Take your training system to the highest, most awesome and impressive area in your facility. Do in-situ or guerilla-warfare simulation with it! Train with the system in closed confines, like in the back section of your fellow colleagues’ Chevy Suburban, or else inside PHARM aircraft and land ambulances!

Pingback: Recipe for SALAD (Suction Assisted Laryngoscopy Airway Decontamination) Simulation AKA “VomiQuin” | Prehospital and Retrieval Medicine - THE PHARM dedicated to the memory of Dr John Hinds
Good point on both the electrical safety and the sim overload
(i) ELECTRICS
I’ve set mine up with pump and electrics contained in a separate Pelican (TM) waterproof case which is placed distant to the manniquin/vomi-quin. This means that both the Laerdal airway trainer and the pump/electrics can easily be carried in their respective hard cases. Am experimenting with using soft distendible containers for vomitus rather than hard plastic
A major challenge is still to provide a decent suction unit when running this sim outside of ED/OT/wards – obviously ‘train as you would fight’ with options such as the Laerdal portable suction unit etc – or RAPP make a Venturi-based suction system that can be driven by compressed air/O2 (useful if demo-ing in a conference facility)
(ii) SIM OVERLOAD
Although ti’s easy to vary the ‘dynamic’ test from a slot trickle to a Poltergeist-like geyser, this is more for show than for proper training
I like to ensure everyone gets a go at both static and dynamic tests, as well as to explore the problems with VL vs DL in the soiled airway
It’s also a good chance to practice the technique of placing a large bore ETT in the oesophagus as a conduit to drain eg: GI bleed whilst perform suction /airway decontamination under direct laryngoscopy
THANKS
Kudos to Jim DuCanto for sharing his model and for inspiring others to create their own vomi-quins
I look forward to further refinements, particularly in regard to electrics and safety (anyone tried using those submersible bilge or pond pumps yet? I have one for my kayak, maybe should try that next…)
LikeLike
Pingback: Refinements on SALAD Sim - KI Doc
Pingback: Portable Vomit Simulator - KI Doc
Pingback: DIY-Anleitung für SALAD-Simulatoren – Teil I – #dasFOAM
Pingback: The Vomitkin and me. A love story. – Croaker's EMS Blog
Pingback: Podcast #109 - Tips to Manage the Contaminated Airway with Jim DuCanto « FOAM EMS
How did you connect the hose to the bladder?
LikeLike
You can use garden hose connectors or find various diameter tubes at hardward store that will fit outlet snug and then electricians tape keep the ends together. An even better seal is achieved by using silicone tape or rubber seal tape “Magic Wrap” to seal the connection before the electricians tape goes on top.
LikeLike
Pingback: Three Airway Management Techniques for Airway Decontamination in Massive Emesis: A Manikin Study - The Western Journal of Emergency Medicine
Pingback: SALAD – extreme Intubation üben! – Nerdfallmedizin.de
Pingback: DIY-Anleitung für SALAD-Simulatoren - dasFOAM Think Tank
Have you ever considered using a peristalic pump head. Some work on 12 or 24 vdc which would raise the safety profile. The “vomit” would stay within the tubing and therefore would be easier to clean. You could engage it with a momentary contact switch. Given the peristalic nature of the pumping action you could simulate waves (heaves) of regurgitation. These are used in a number of use cases from aquarium dosing to labratories and feedlots so I am sure you could find one acceptable to moving a thick liquid. I have also used an old Knightstar 335 to simulate a breathing patient via the lung connection to give students a bit more challenge.
LikeLike